Computer Graphics - 실습 1주차
기본 세팅 확인
import cv2
import numpy as np
import matplotlib.pyplot as plt

src = np.zeros((512,512), dtype=np.uint8)
plt.plot([0,1,2,3,4])
plt.show()


cv2.imshow('src',src)
cv2.waitKey()
cv2.destroyAllWindows()
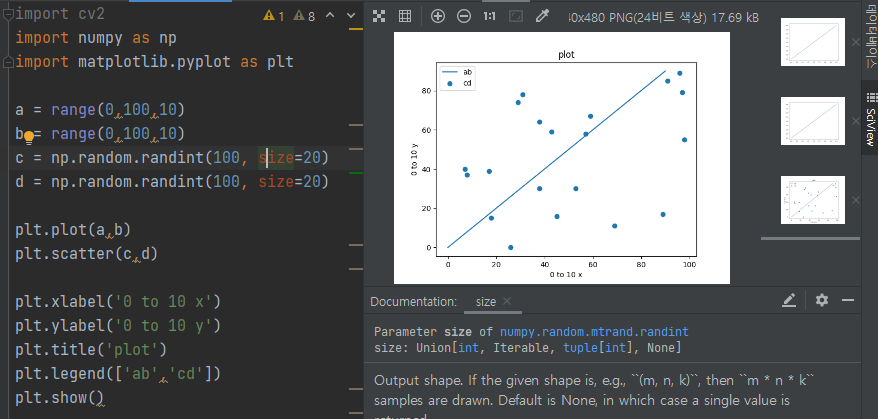
Matplotlib 기초 이해
import numpy as np
import matplotlib.pyplot as plt

a = range(0,100,10)
b = range(0,100,10)
c = np.random.randint(100, size=20)
d = np.random.randint(100, size=20)

plt.plot(a,b)
plt.scatter(c,d)

plt.xlabel('0 to 10 x') #x,y축 이름 지정
plt.ylabel('0 to 10 y')
plt.title('plot') #그래프 이름 지정
plt.legend(['ab','cd']) #범례 표시. 여러개의 그래프가 있어야 가능하다.
plt.show()  #그래프 출력
opencv 기초 이해
import cv2
import numpy as np
src = np.full((2,2),100,dtype=np.uint8)
print('<original>')
print(src)
print("<add>")
print(cv2.add(src,3))
print(cv2.add(src,200))
print("<subtract>")
print(cv2.subtract(src,10))
print(cv2.subtract(src,150))
print("<multiply>")
print(cv2.multiply(src,2))
print(cv2.multiply(src,5))
print("<divide>")
print(cv2.divide(src,10))
print(cv2.divide(src,200))
# 계산 결과 0~255사이의 값을 가짐
[결과화면]
<original>
[[100 100]
 [100 100]]
<add>
[[103 103]
 [103 103]]
[[255 255]
 [255 255]]
<subtract>
[[90 90]
 [90 90]]
[[0 0]
 [0 0]]
<multiply>
[[200 200]
 [200 200]]
[[255 255]
 [255 255]]
<divide>
[[10 10]
 [10 10]]
[[0 0]
 [0 0]]
=> 0~255값만을 가질수 있고 오바하면 255, 적어지면 0으로 나타난다.
실습
float unit8차이
import numpy as np


img01 = np.zeros((200,20))  #200x200 크기의 0으로 채워진 이미지
img02 = np.ones((20,20)) #200x200 크기의 1으로 채워진 이미지

img03 = np.zeros((200,20), dtype=np.uint8)
img04 = np.ones((200,20), dtype=np.uint8)
img05 = np.full((200,20),255, dtype=np.uint8)

print(img01.dtype)
print(img03.dtype)

결과
float64
uint8
=> dtype를 설정하지 않으면 기본값은 float64이다.
cv2.imshow("img01",img01)
cv2.imshow("img02",img02)
cv2.imshow("img03",img03)
cv2.imshow("img04",img04)
cv2.imshow("img05",img05)

cv2.waitKey()
cv2.destroyWindow()
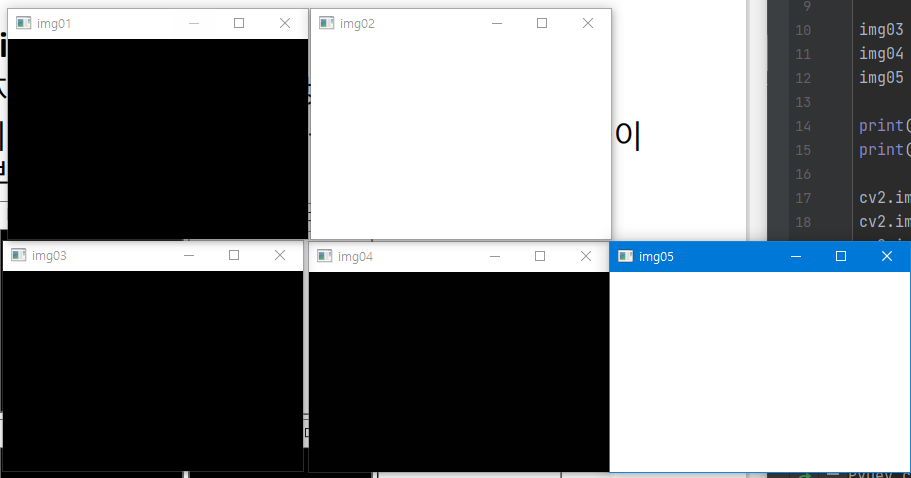
결론
- float
- black : 0
- white : 1
- unit8
- black : 0
- white : 255
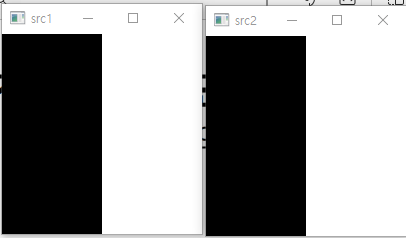
특정 pixel값 접근
pixel값을 이용해 색깔을 바꿔준다.
src1 = np.zeros((200,200))
src2 = np.zeros((200,200),np.uint8)

src1[:,100:200] = 1;
src2[:,100:200] = 255

cv2.imshow("src1",src1)
cv2.imshow("src2",src2)

cv2.waitKey()
cv2.destroyWindow()
print(src1[50,50],src1[150,150])
print(src2[50,50],src2[150,150])

print(src1[100,95:105])
print(src2[100,95:105])

결과
0.0 1.0
0 255
[0. 0. 0. 0. 0. 1. 1. 1. 1. 1.]
[  0   0   0   0   0 255 255 255 255 255]
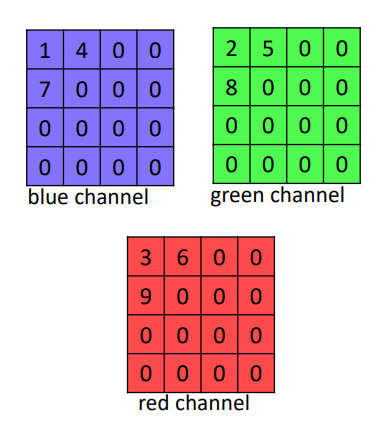
컬러이미지
import cv2
import numpy as np

src = np.zeros((300,300,3),dtype=np.uint8)
src[0,0] = [1,2,3]
src[0,1] = [4,5,6]
src[1,0] = [7,8,9]

print(src.shape)
print(src[0,0,0],src[0,0,1],src[0,0,2])
print(src[0,0])
# print(src[0])
# print(src)

cv2.imshow("src",src)

cv2.waitKey()
cv2.destroyWindow()
(300, 300, 3)
1 2 3
[1 2 3]
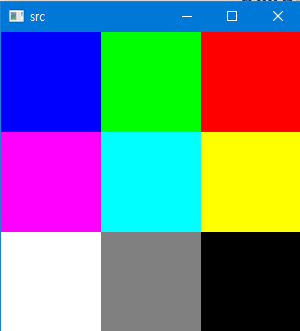
컬러이미지
src = np.zeros((300,300,3),dtype=np.uint8)

src[0:100,0:100,0] = 255
src[0:100,100:200,1] = 255
src[0:100,200:300,2] = 255

src[100:200,0:100,0] = 255
src[100:200,0:100,2] = 255


src[100:200,100:200,0] = 255
src[100:200,100:200,1] = 255

src[100:200,200:300,1] = 255
src[100:200,200:300,2] = 255

src[200:,:100,0] = 255
src[200:,:100,1] = 255
src[200:300,:100,2] = 255

src[200:,100:200,0] = 128
src[200:,100:200,1] = 128
src[200:,100:200,2] = 128
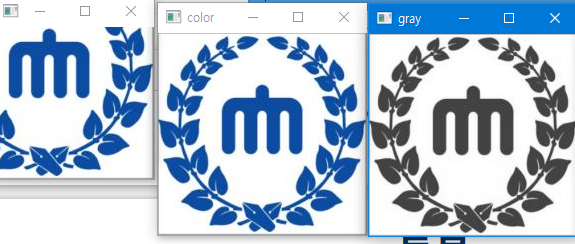
실제 이미지로 이미지 처리하기
이미지 변환 BGR >RGB, GRAY변환
import matplotlib.pyplot as plt

import cv2
import numpy as np

src = cv2.imread('logo.JPG')
gray = cv2.cvtColor(src, cv2.COLOR_BGR2GRAY)

print('[color shape] : {0}'.format(src.shape))
print('[gray shape] : {0}'.format(gray.shape))

cv2.imshow("color",src)
cv2.imshow("gray",gray)
cv2.imshow("slice",src[50:230,50:230,:])

cv2.waitKey()
cv2.destroyWindow()

결과
[color shape] : (202, 209, 3)
[gray shape] : (202, 209)
실제 이미지로 이미지 처리하기
import matplotlib.pyplot as plt
import cv2
import numpy as np
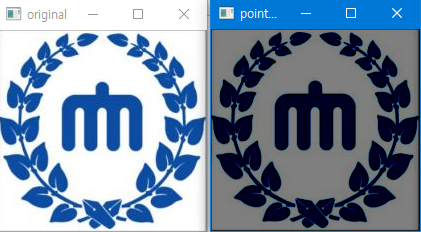
def point_processing(src, type='original'):
dst = np.zeros(src.shape, dtype=np.uint8)
if type=='original':
dst = src.copy()
elif type=='darken':
for channel in range(3):
dst[:,:,channel] = cv2.subtract(src[:,:,channel],128)
elif type=='lower_contrast':
calc = np.full((dst.shape),2,dtype=np.uint8)
dst = cv2.divide(src,calc)
elif type=='non_linear_lower_contrast':
for channel in range(3):
x = src[:,:,channel]
print(x)
dst[:,:,channel] = ((x/255) ** (1/3)**255).astype(np.uint8)
elif type=='invert':
pass
elif type=='lighten':
pass
elif type == 'raise_contrast':
pass
elif type=='non_linear_raise_contrast':
pass
return dst
if __name__ == '__main__':
src = cv2.imread('logo.JPG')
dst = point_processing(src,'darken')
cv2.imshow('original',src)
cv2.imshow('point_processing',dst)
cv2.imwrite('./darken.jpg',dst) #이미지 파일 생성
cv2.waitKey()
cv2.destroyAllWindows()
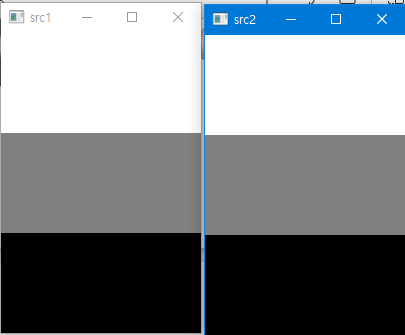
실습 과제
import matplotlib.pyplot as plt

import cv2
import numpy as np

src1 = np.zeros((300,200))
src2 = np.zeros((300,200),dtype=np.uint8)

src1[:100] = 1
src1[100:200] = 0.5
src1[200:] = 0
src2[:100] = 255
src2[100:200] = 128
src2[200:] = 0

cv2.imshow('src1',src1)
cv2.imshow('src2',src2)

cv2.waitKey()
cv2.destroyAllWindows()